
School cafeteria food gets a bad reputation but there were always a few exceptions, and for a lot of people the Lunch Lady Peanut Butter Bars were at the top of the list. Soft peanut butter oat base, thick cocoa peanut butter frosting on top, cut into rectangles and served from a tray. Straightforward and deeply satisfying in a way that held up even outside the cafeteria context. This version replicates that texture and flavor closely using pantry staples and one 9×13 pan, with no special equipment and a total time under an hour from start to finished frosted bars.
Understanding how to make lunch lady peanut butter bars correctly comes down to two details above everything else: not overbaking the base, and using commercial peanut butter throughout rather than natural. Both matter more than any other variable in the recipe.
Ingredients for Lunch Lady Peanut Butter Bars
Bar Base
- 1/2 cup unsalted butter, softened
- 1/2 cup granulated sugar
- 1/2 cup packed light brown sugar
- 1/2 cup creamy peanut butter, Jif or Skippy recommended
- 2 large eggs, room temperature
- 1 tsp vanilla extract
- 1 cup all-purpose flour
- 1 cup quick-cooking oats
- 1/2 tsp baking soda
- 1/4 tsp fine salt
Chocolate Peanut Butter Frosting
- 1/4 cup unsalted butter, softened
- 1/4 cup creamy peanut butter
- 2 tbsp unsweetened cocoa powder, sifted
- 2 cups powdered sugar, sifted
- 3 to 4 tbsp whole milk, added one tablespoon at a time
- 1/2 tsp vanilla extract
- Pinch of fine salt
Baking the Lunch Lady Peanut Butter Bars Base
Cream butter at true room temperature, not slightly cold, not softened in the microwave unevenly. Properly softened butter holds air during creaming, which gives the bars their light-textured interior rather than a dense, compact result. This step takes 2 full minutes with a hand mixer and it is worth it.
- Preheat oven to 350°F. Line a 9×13 baking pan with parchment paper or grease lightly with cooking spray.
- Beat butter, granulated sugar, and brown sugar together on medium speed for 2 to 3 minutes until the mixture is pale and noticeably fluffy. Add peanut butter and beat for another minute until fully incorporated.
- Add eggs one at a time, beating briefly after each. Add vanilla and mix just to combine.
- Whisk flour, oats, baking soda, and salt in a separate bowl. Add to the butter mixture all at once and mix on low speed until no dry streaks remain. Do not overmix once the flour is added.
- Transfer the dough to the prepared pan. It is thick and slightly sticky. Use a lightly dampened offset spatula or the back of a spoon to press it into an even layer reaching all four corners.
- Bake for 18 to 22 minutes. The edges will look set and just pulling away from the pan sides. The center should look barely underdone, slightly matte but not wet. Pull them at this point. They firm as they cool and the final texture is chewier and more satisfying than bars baked until a toothpick comes out completely clean.
- Cool completely in the pan before making or applying the frosting.
Making the Frosting and Getting the Texture Right
Beat butter and peanut butter together first before adding any dry ingredients. Starting with these two fats combined produces a smoother, more cohesive frosting than adding everything at once. Once smooth, add cocoa powder and vanilla, then powdered sugar gradually with milk alternating between additions. The finished frosting should be thick enough to hold a soft peak when lifted with a spatula but spreadable enough to glide across the bar surface without tearing. If it feels stiff, add milk by the teaspoon. If it feels loose, add powdered sugar one tablespoon at a time.
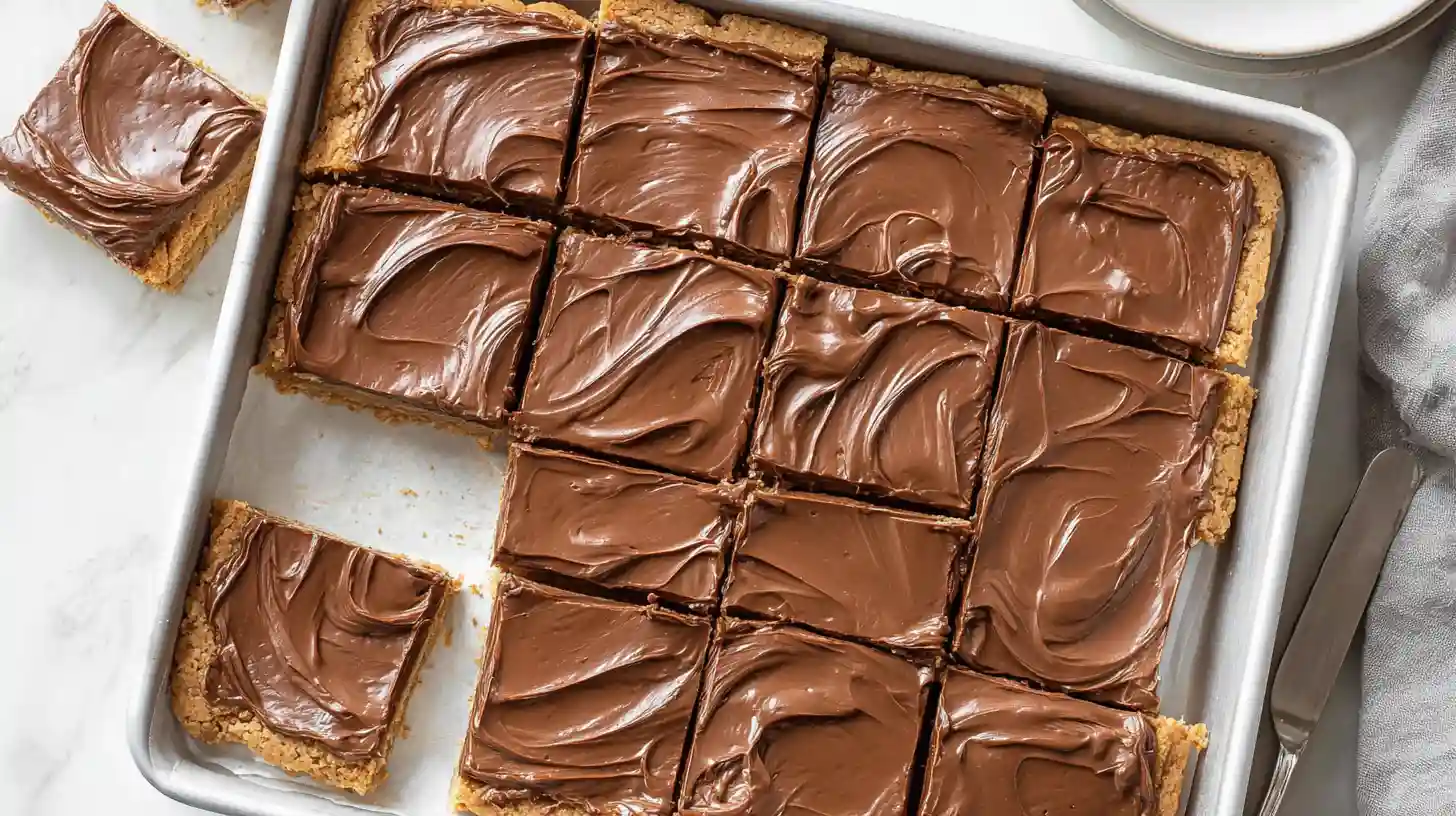
Spread frosting across the fully cooled bar base in one direction using an offset spatula, working from one short end to the other in long even strokes. Trying to go back over areas already spread lifts the surface of the bar into the frosting. One pass is enough for a smooth, even layer that looks clean when cut.
Variations on the Classic Lunch Lady Chocolate Peanut Butter Bars
For lunch ladies peanut butter bars with a crunchier texture throughout, substitute crunchy peanut butter for creamy in the bar base only. The peanut pieces bake into the dough and add a subtle bite that contrasts well against the smooth frosting on top. Keep creamy peanut butter in the frosting regardless since crunchy peanut butter doesn’t blend as smoothly into the cocoa butter mixture and leaves the frosting with an uneven surface texture.
Pressing crushed Butterfinger pieces into the frosting before it sets adds a toffee-peanut crunch on top that pushes these firmly into butterfinger peanut butter snack cake territory, rich, layered, and noticeably more indulgent than the plain version. About 1/2 cup of coarsely crushed Butterfinger scattered across the frosting surface right after spreading is the right amount without making every bite feel like pure candy. Mini chocolate chips pressed in lightly work the same way for a more straightforward chocolate addition.
How to Store and Slice for the Cleanest Results
Store bars in an airtight container at room temperature for up to 4 days. Refrigerating firms the frosting into a slightly fudgier texture and makes the bars easier to slice into clean rectangles without the frosting smearing. If you want the best lunch lady peanut butter bars presentation for serving, chill the frosted pan for 20 minutes before cutting. Run a sharp knife under hot water, dry it, and press straight down through each cut rather than dragging. Wipe the blade between cuts. The bar base is dense enough that it holds its shape cleanly at the edges without crumbling when sliced cold. These also freeze well, wrapped individually, for up to 2 months.
FAQ
Why do my bars come out cakey instead of chewy?
Two things cause this. The first is overbaking. Cakey texture in bar cookies almost always means too much time in the oven. The bars need to come out with the center looking underdone. The second cause is using natural peanut butter, which has a higher water content and a looser consistency than commercial brands. That extra moisture affects the dough structure during baking and produces a lighter, less dense result. Stick with Jif or Skippy style peanut butter for easy lunch lady peanut butter bars that bake up with the correct dense and chewy texture throughout every bite.
Can I use old-fashioned oats instead of quick oats?
Old-fashioned rolled oats work but change the texture noticeably. They stay more distinct during baking and produce a chewier, more textured bar with visible oat pieces throughout. Quick oats absorb into the dough more fully and produce the smoother, more uniform base that the original peanut butter lunch ladies cookie bars are associated with. If old-fashioned oats are all you have, pulse them in a food processor 4 to 5 times to partially break them down before adding to the dough. The result will be closer to the quick oat version without being identical.
Can the frosting be made ahead and stored separately?
Yes. Store it in an airtight container in the refrigerator for up to 3 days. Bring it back to room temperature for 30 to 40 minutes before using and beat briefly with a hand mixer to restore its spreadable consistency. Cold frosting straight from the fridge is too stiff to spread without tearing the bar surface. If it still feels too thick after warming, add a teaspoon of milk and beat again. The flavor of the frosting actually deepens slightly after a day in the fridge as the cocoa and peanut butter meld together, which is worth keeping in mind for lunch lady peanut butter bars recipes made over two days.
How do I know when the bars are done without overbaking them?
Look at the surface rather than using a toothpick as the primary indicator. The edges should look fully set, slightly darker, and just starting to pull away from the pan sides. The center should look matte rather than glossy or wet but should still give slightly when you press it very gently with one fingertip. At this point, the internal temperature of the bars is high enough to carry over into a fully baked interior during cooling, even though the top surface looks underdone. A toothpick at this stage will still come out with a few moist crumbs, which is exactly right for the best lunch lady peanut butter bars texture after cooling.
Can I double the recipe for a larger batch?
A doubled batch bakes well on a half-sheet pan, approximately 13×18 inches. Spread the dough evenly across the larger surface and check for doneness at 18 minutes since the shallower dough depth in a bigger pan means the edges set and brown faster than in the standard 9×13. The frosting doubles cleanly using the same method. For how to make lunch lady peanut butter bars for a large group, a doubled batch cut into 48 small rectangles is the most practical serving format, giving everyone a full bar without the portions feeling too large or too small for a dessert table setting.
Lunch Lady Peanut Butter Bars
Ingredients
Equipment
Method
- Preheat oven to 350°F. Line or grease a 9×13 baking pan.
- Beat butter, both sugars on medium speed 2 to 3 minutes until pale and fluffy. Add peanut butter and beat 1 minute. Add eggs one at a time, then vanilla.
- Whisk flour, oats, baking soda, and salt. Add to wet mixture and mix on low until just combined.
- Press dough evenly into the pan. Bake 18 to 22 minutes until edges are set and center looks barely underdone. Cool completely.
- Beat frosting butter and peanut butter until smooth. Add cocoa, vanilla, then alternate powdered sugar and milk until thick and spreadable.
- Spread frosting over cooled bars in one direction. Chill 20 minutes, then slice into rectangles with a warm clean knife.
Notes
- Use commercial creamy peanut butter – natural peanut butter produces cakey, greasy bars that don’t hold together properly.
- Pull bars from the oven when the center still looks slightly underdone – they firm up completely as they cool.
- Cool bars fully before frosting or the butter in the frosting will melt and the topping will slide.
- Chill before slicing for the cleanest cuts through the frosting layer.
- Store at room temperature up to 4 days or freeze individually wrapped for up to 2 months.